vue Router 4源码解析:如何创建路由
Vue Router 基础使用
在 vue3 项目中使用 vue router,我们通常会在 /src/router 目录下定义 router 相关参数,然后在 main 文件中引入安装至 app 实例
1// 定义 router 参数
2import { createRouter, createWebHashHistory } from 'vue-router'
3
4// 创建一个可以被 Vue 应用程序使用的路由实例
5export const router = createRouter({
6  // 创建一个 hash 历史记录。
7  history: createWebHashHistory(),
8  // 应该添加到路由的初始路由列表。
9  routes: basicRoutes as unknown as RouteRecordRaw[],
10  scrollBehavior: () => ({ left: 0, top: 0 }),
11})
12
13// main 文件中安装至 app 实例
14import { router } from '@/router'
15
16app.use(router)
所以根据使用可以看到,核心的方法主要是 createRouter 创建路由实例,和 app.use 挂载路由(实际会调用 router.install 方法),下面我们来分析具体实现原理
创建路由原理
通过 createRouter 创建路由实例,createRouter 方法的核心主要是返回一个路由实例 router,我们先通过 TS 类型定义看看创建参数和 router 实例包含的属性
1export function createRouter(options: RouterOptions): Router {
2  /*...*/
3}
函数参数 RouterOptions 的 TS 类型定义,可以看到比较核心的两个属性是 history 和 routes,history 定义路由导航方式是 hash 模式还是 history 模式,routes 定义初始化的路由列表。parseQuery 和 stringifyQuery 两个属性解析和序列化路由,可以用来做路由参数加密
1export interface RouterOptions extends PathParserOptions {
2  // 定义路由导航方式,分为 hash 模式和 history 模式
3  history: RouterHistory
4  // 初始化路由列表
5  routes: Readonly<RouteRecordRaw[]>
6  // 路由跳转后滚动事件
7  scrollBehavior?: RouterScrollBehavior
8  // 解析和序列化路由参数,常用于路由参数加密
9  parseQuery?: typeof originalParseQuery
10  stringifyQuery?: typeof originalStringifyQuery
11  // 定义 router-link 组件的链接被点击后,默认在链接上添加的 class 名称
12  linkActiveClass?: string
13  linkExactActiveClass?: string
14}
函数返回类型主要定义了 router 实例的核心属性和自定义方法
1export interface Router {
2  // 当前路由
3  readonly currentRoute: Ref<RouteLocationNormalizedLoaded>
4  // 路由配置项,即 createRouter 传入参数
5  readonly options: RouterOptions
6  // 是否允许监听 history 事件,通常用于微前端
7  listening: boolean
8
9  // 路由的 crud
10  addRoute(parentName: RouteRecordName, route: RouteRecordRaw): () => void
11  addRoute(route: RouteRecordRaw): () => void
12  removeRoute(name: RouteRecordName): void
13  hasRoute(name: RouteRecordName): boolean
14  getRoutes(): RouteRecord[]
15
16  // 返回路由地址的标准化版本
17  resolve(
18    to: RouteLocationRaw,
19    currentLocation?: RouteLocationNormalizedLoaded
20  ): RouteLocation & { href: string }
21
22  // 路由 push 跳转,history 栈会增加跳转路由
23  push(to: RouteLocationRaw): Promise<NavigationFailure | void | undefined>
24
25  // 路由 replace 跳转,更换 history 栈顶元素
26  replace(to: RouteLocationRaw): Promise<NavigationFailure | void | undefined>
27
28  // 路由后退、前进、跳转
29  back(): ReturnType<Router['go']>
30  forward(): ReturnType<Router['go']>
31  go(delta: number): void
32
33  // 路由守卫三个方法
34  beforeEach(guard: NavigationGuardWithThis<undefined>): () => void
35  beforeResolve(guard: NavigationGuardWithThis<undefined>): () => void
36  afterEach(guard: NavigationHookAfter): () => void
37  // 路由错误处理
38  onError(handler: _ErrorHandler): () => void
39  // 是否完成初始化导航
40  isReady(): Promise<void>
41  // vue 实例注册 router 的方法
42  install(app: App): void
43}
接下来我们看 createRouter 方法具体实现,由于方法很长,这里先列出属性定义,后续再逐步展开,其中相对比较核心的包括
- matcher 属性:解析路由配置,创建路由规则,处理路由匹配
- parseQuery 和 stringifyQuery 属性:路由参数处理
- routerHistory 属性:定义路由历史记录处理方式,分为 hash 和 history(计划第二篇文章讲解)
- beforeGuards、beforeResolveGuards、afterGuards 属性:路由导航(计划第三篇文章讲解)
- install 方法:向 vue 实例中注册 router 实例
1export function createRouter(options: RouterOptions): Router {
2  // 解析路由配置,创建路由规则,处理路由匹配
3  const matcher = createRouterMatcher(options.routes, options)
4  // 路由参数处理
5  const parseQuery = options.parseQuery || originalParseQuery
6  const stringifyQuery = options.stringifyQuery || originalStringifyQuery
7  // 定义路由历史记录处理方式,分为 hash 和 history
8  const routerHistory = options.history
9
10  // 定义路由守卫
11  const beforeGuards = useCallbacks<NavigationGuardWithThis<undefined>>()
12  const beforeResolveGuards = useCallbacks<NavigationGuardWithThis<undefined>>()
13  const afterGuards = useCallbacks<NavigationHookAfter>()
14
15  // 定义当前路由
16  const currentRoute = shallowRef<RouteLocationNormalizedLoaded>(
17    START_LOCATION_NORMALIZED
18  )
19  // 暂存正在进行的导航操作,用于地址变化时判断导航是否完成
20  let pendingLocation: RouteLocation = START_LOCATION_NORMALIZED
21
22  // 路由参数规范化
23  const normalizeParams = applyToParams.bind(
24    null,
25    (paramValue) => '' + paramValue
26  )
27  const encodeParams = applyToParams.bind(null, encodeParam)
28  const decodeParams: (params: RouteParams | undefined) => RouteParams =
29    applyToParams.bind(null, decode)
30
31  let started: boolean | undefined
32  const installedApps = new Set<App>()
33
34  const router: Router = {
35    /* router 实例属性 */
36    install,
37  }
38
39  return router
40}
matcher 属性
matcher 属性由 createRouterMatcher 方法创建,方法中定义了 matchers 数组和 matcherMap map 来存储路由匹配规则,并返回了 5 个关于 matcher 的增删改查操作函数
1export function createRouterMatcher(
2  routes: Readonly<RouteRecordRaw[]>,
3  globalOptions: PathParserOptions
4): RouterMatcher {
5  // 定义 matchers 数组,存储所有路由匹配规则
6  const matchers: RouteRecordMatcher[] = []
7  // 定义 matcher Map,通过 路由名称 更快的定位到匹配规则
8  const matcherMap = new Map<RouteRecordName, RouteRecordMatcher>()
9  // 合并选项参数
10  globalOptions = mergeOptions(
11    { strict: false, end: true, sensitive: false } as PathParserOptions,
12    globalOptions
13  )
14
15  // 通过 路由名称获取对应 matchers
16  function getRecordMatcher(name: RouteRecordName) {}
17
18  // 添加路由
19  function addRoute(
20    record: RouteRecordRaw,
21    parent?: RouteRecordMatcher,
22    originalRecord?: RouteRecordMatcher
23  ) {}
24
25  function removeRoute(matcherRef: RouteRecordName | RouteRecordMatcher) {}
26
27  // 获取 matchers 数组
28  function getRoutes() {}
29
30  // 新增 matcher
31  function insertMatcher(matcher: RouteRecordMatcher) {}
32
33  // 获得路由的标准化版本
34  function resolve(
35    location: Readonly<MatcherLocationRaw>,
36    currentLocation: Readonly<MatcherLocation>
37  ): MatcherLocation {}
38
39  // 遍历初始化路由,对每一个路由使用 addRoute 方法处理
40  routes.forEach((route) => addRoute(route))
41
42  return { addRoute, resolve, removeRoute, getRoutes, getRecordMatcher }
43}
addRoute 方法
addRoute 方法用来添加路由,方法参数有三个:record 是需要添加的路由、parent 是父 matcher、originalRecord 是原始 matcher,parent 和 originalRecord 参数是可选参数,如果传入的话说明添加路由还需要结合父路由和别名路由处理。下面是 addRoute 方法的实现步骤
-
通过
normalizeRouteRecord方法标准化 record,合并 options 和全局 option1function addRoute( 2 record: RouteRecordRaw, 3 parent?: RouteRecordMatcher, 4 originalRecord?: RouteRecordMatcher 5) { 6 const isRootAdd = !originalRecord 7 // 标准化 record 8 const mainNormalizedRecord = normalizeRouteRecord(record) 9 mainNormalizedRecord.aliasOf = originalRecord && originalRecord.record 10 // 合并自定义 options 和全局 options 11 const options: PathParserOptions = mergeOptions(globalOptions, record) 12}这里的
normalizeRouteRecord方法会将传入的 record 转换为一个标准的 matcher 数组1export function normalizeRouteRecord( 2 record: RouteRecordRaw 3): RouteRecordNormalized { 4 return { 5 path: record.path, 6 redirect: record.redirect, 7 name: record.name, 8 meta: record.meta || {}, 9 aliasOf: undefined, 10 beforeEnter: record.beforeEnter, 11 props: normalizeRecordProps(record), 12 children: record.children || [], 13 instances: {}, 14 leaveGuards: new Set(), 15 updateGuards: new Set(), 16 enterCallbacks: {}, 17 components: 18 'components' in record 19 ? record.components || null 20 : record.component && { default: record.component }, 21 } 22} -
处理别名 alias
根据官网的说明,alias 不会修改访问的 url,所以在处理 alias 参数时,取出别名属性后放入 normalizedRecords 数组中,相当于新增一条访问的路由
1function addRoute(/*相关参数*/) { 2 if ('alias' in record) { 3 // alias 统一转化为数组遍历 4 const aliases = 5 typeof record.alias === 'string' ? [record.alias] : record.alias! 6 for (const alias of aliases) { 7 normalizedRecords.push( 8 assign({}, mainNormalizedRecord, { 9 components: originalRecord 10 ? originalRecord.record.components 11 : mainNormalizedRecord.components, 12 // 将别名路由放入 path 13 path: alias, 14 aliasOf: originalRecord 15 ? originalRecord.record 16 : mainNormalizedRecord, 17 }) as typeof mainNormalizedRecord 18 ) 19 } 20 } 21} -
遍历 normalizedRecords,处理嵌套路由 path,通过
createRouteRecordMatcher方法生成匹配器createRouteRecordMatcher方法通过tokenizePath编码 +tokensToParser解码,将 path 转化为一个 token 数组,后续通过传入的 path 就能够匹配到对应的路由1function addRoute(/*相关参数*/) { 2 for (const normalizedRecord of normalizedRecords) { 3 const { path } = normalizedRecord 4 // 处理嵌套路由 path 5 if (parent && path[0] !== '/') { 6 const parentPath = parent.record.path 7 const connectingSlash = 8 parentPath[parentPath.length - 1] === '/' ? '' : '/' 9 normalizedRecord.path = 10 parent.record.path + (path && connectingSlash + path) 11 } 12 // 创建匹配器 13 matcher = createRouteRecordMatcher(normalizedRecord, parent, options) 14 } 15} -
处理 originRecord
如果 originRecord 存在就将 matcher 放入 originRecord 的 alias 中;否则将第一个 matcher 作为 originalRocord 处理。此外当 originalMatcher 和 matcher 不相等时,说明 matcher 是有别名记录产生,放入 originalMatcher 的 alias 中
1function addRoute(/*相关参数*/) { 2 for (const normalizedRecord of normalizedRecords) { 3 if (originalRecord) { 4 originalRecord.alias.push(matcher) 5 } else { 6 // 如果 originRecord 不存在的话,将第一个 matcher 作为 originalRocord 7 originalMatcher = originalMatcher || matcher 8 // originalMatcher 和 matcher 不相等时,说明 matcher 是有别名记录产生,放入 originalMatcher 的 alias 中 9 if (originalMatcher !== matcher) originalMatcher.alias.push(matcher) 10 11 // 避免嵌套调用删除多余路由 12 if (isRootAdd && record.name && !isAliasRecord(matcher)) 13 removeRoute(record.name) 14 } 15 } 16} -
遍历子路路由,循环调用 addRoute 方法处理子路由
1function addRoute(/*相关参数*/) { 2 for (const normalizedRecord of normalizedRecords) { 3 // 5. 遍历子路路由,循环调用 addRoute 方法处理子路由 4 if (mainNormalizedRecord.children) { 5 const children = mainNormalizedRecord.children 6 for (let i = 0; i < children.length; i++) { 7 addRoute( 8 children[i], 9 matcher, 10 originalRecord && originalRecord.children[i] 11 ) 12 } 13 } 14 } 15} -
插入 matcher
1function addRoute(/*相关参数*/) {
2  for (const normalizedRecord of normalizedRecords) {
3    // 排除掉没有定义 components、name、redirect 其中一个的 matcher,避免无法展示路由内容
4    if (
5      (matcher.record.components &&
6        Object.keys(matcher.record.components).length) ||
7      matcher.record.name ||
8      matcher.record.redirect
9    ) {
10      insertMatcher(matcher)
11    }
12  }
13}
在
insertMatcher方法中,会首先比较优先级,判断需要插入的 matcher 优先级更高才会放入到 matchers 数组。同时,如果 matcher 不是别名 record 的话,放入 matcherMap 中,便于通过 name 快速检索1function insertMatcher(matcher: RouteRecordMatcher) { 2 let i = 0 3 while ( 4 i < matchers.length && 5 // 比较优先级,避免重复插入 6 comparePathParserScore(matcher, matchers[i]) >= 0 && 7 (matcher.record.path !== matchers[i].record.path || 8 !isRecordChildOf(matcher, matchers[i])) 9 ) { 10 i++ 11 matchers.splice(i, 0, matcher) 12 } 13 14 // 如果 matcher 不是别名 record 的话,放入 matcherMap 中,便于通过 name 快速检索 15 if (matcher.record.name && !isAliasRecord(matcher)) 16 matcherMap.set(matcher.record.name, matcher) 17} -
返回一个删除原始 matcher 后的 matcher 集合
1function addRoute(/*相关参数*/) {
2  return originalMatcher ? () => removeRoute(originalMatcher!) : noop
3}
至此 addRoute 方法的整体流程就完成了,流程很长,用一张图总结一下 addRoute 的整体实现过程

removeRoute 方法
removeRoute 方法的实现过程相对比较简单
- 如果传入的参数是 string / symbol 类型,说明是路由名称,从 matcherMap 数组中找到名称对应 matcher,分别删除 matcherMap、matchers、children、alias 中的 matcher
- 否则如果从 matchers 找到需要删除的 matcher 的话,同样也删除 matcherMap、matchers、children、alias 中的 matcher
1function removeRoute(matcherRef: RouteRecordName | RouteRecordMatcher) {
2  if (isRouteName(matcherRef)) {
3    const matcher = matcherMap.get(matcherRef)
4    if (matcher) {
5      matcherMap.delete(matcherRef)
6      matchers.splice(matchers.indexOf(matcher), 1)
7      matcher.children.forEach(removeRoute)
8      matcher.alias.forEach(removeRoute)
9    }
10  } else {
11    const index = matchers.indexOf(matcherRef)
12    if (index > -1) {
13      matchers.splice(index, 1)
14      if (matcherRef.record.name) matcherMap.delete(matcherRef.record.name)
15      matcherRef.children.forEach(removeRoute)
16      matcherRef.alias.forEach(removeRoute)
17    }
18  }
19}
parseQuery 和 stringifyQuery 属性
parseQuery 属性和 originalStringifyQuery 属性如果没有自定义的话,会通过默认的方法进行处理,两个方法都是标准的 url 参数序列化和反序列化过程,很值得作为标准模板使用。两个方法的原理在我的另一篇文章 vue 项目优雅的对 url 参数加密 的实现原理部分有详细介绍,这里就不再重复复制了
1import {
2  parseQuery as originalParseQuery,
3  stringifyQuery as originalStringifyQuery,
4} from './query'
5
6const parseQuery = options.parseQuery || originalParseQuery
7const stringifyQuery = options.stringifyQuery || originalStringifyQuery
install 方法
router.install 方法用于向 vue 的 app 实例中这册 router 实例,在 install 方法中,主要包括如下几步
- 向 vue 中注册两个路由内置组件
- 定义
$router属性,可以直接通过this.$router访问 router 属性 - 初始化 router 时设置 started 属性为 true,避免 router 实例注册到多个 vue 实例时重复加载
- 设置初始化路由属性并赋值
- 向 vue 实例中注入 router 等属性,便于全局使用
- 定义 vue 实例卸载的 unmount 方法,重置相关属性,注意 started 设置为 false
1const router: Router = {
2  install(app: App) {
3    const router = this
4    // 向 vue 中注册两个路由内置组件
5    app.component('RouterLink', RouterLink)
6    app.component('RouterView', RouterView)
7
8    // 定义 $router 属性,可以直接通过 this.$router 访问 router 属性
9    app.config.globalProperties.$router = router
10    Object.defineProperty(app.config.globalProperties, '$route', {
11      enumerable: true,
12      get: () => unref(currentRoute),
13    })
14
15    // 初始化 router 时设置 started 属性为 true,避免 router 实例注册到多个 vue 实例时重复加载
16    if (
17      isBrowser &&
18      !started &&
19      currentRoute.value === START_LOCATION_NORMALIZED
20    ) {
21      started = true
22    }
23
24    // 设置初始化路由属性并赋值
25    const reactiveRoute = {} as {
26      [k in keyof RouteLocationNormalizedLoaded]: ComputedRef<
27        RouteLocationNormalizedLoaded[k]
28      >
29    }
30    for (const key in START_LOCATION_NORMALIZED) {
31      reactiveRoute[key] = computed(() => currentRoute.value[key])
32    }
33
34    // 向 vue 实例中注入 router 等属性,便于全局使用
35    app.provide(routerKey, router)
36    app.provide(routeLocationKey, reactive(reactiveRoute))
37    app.provide(routerViewLocationKey, currentRoute)
38
39    // 定义 vue 实例卸载的 unmount 方法,重置相关属性,注意 started 设置为 false
40    const unmountApp = app.unmount
41    installedApps.add(app)
42    app.unmount = function () {
43      installedApps.delete(app)
44      // the router is not attached to an app anymore
45      if (installedApps.size < 1) {
46        // invalidate the current navigation
47        pendingLocation = START_LOCATION_NORMALIZED
48        removeHistoryListener && removeHistoryListener()
49        removeHistoryListener = null
50        currentRoute.value = START_LOCATION_NORMALIZED
51        started = false
52        ready = false
53      }
54      unmountApp()
55    }
56  },
57}
创建路由原理总结
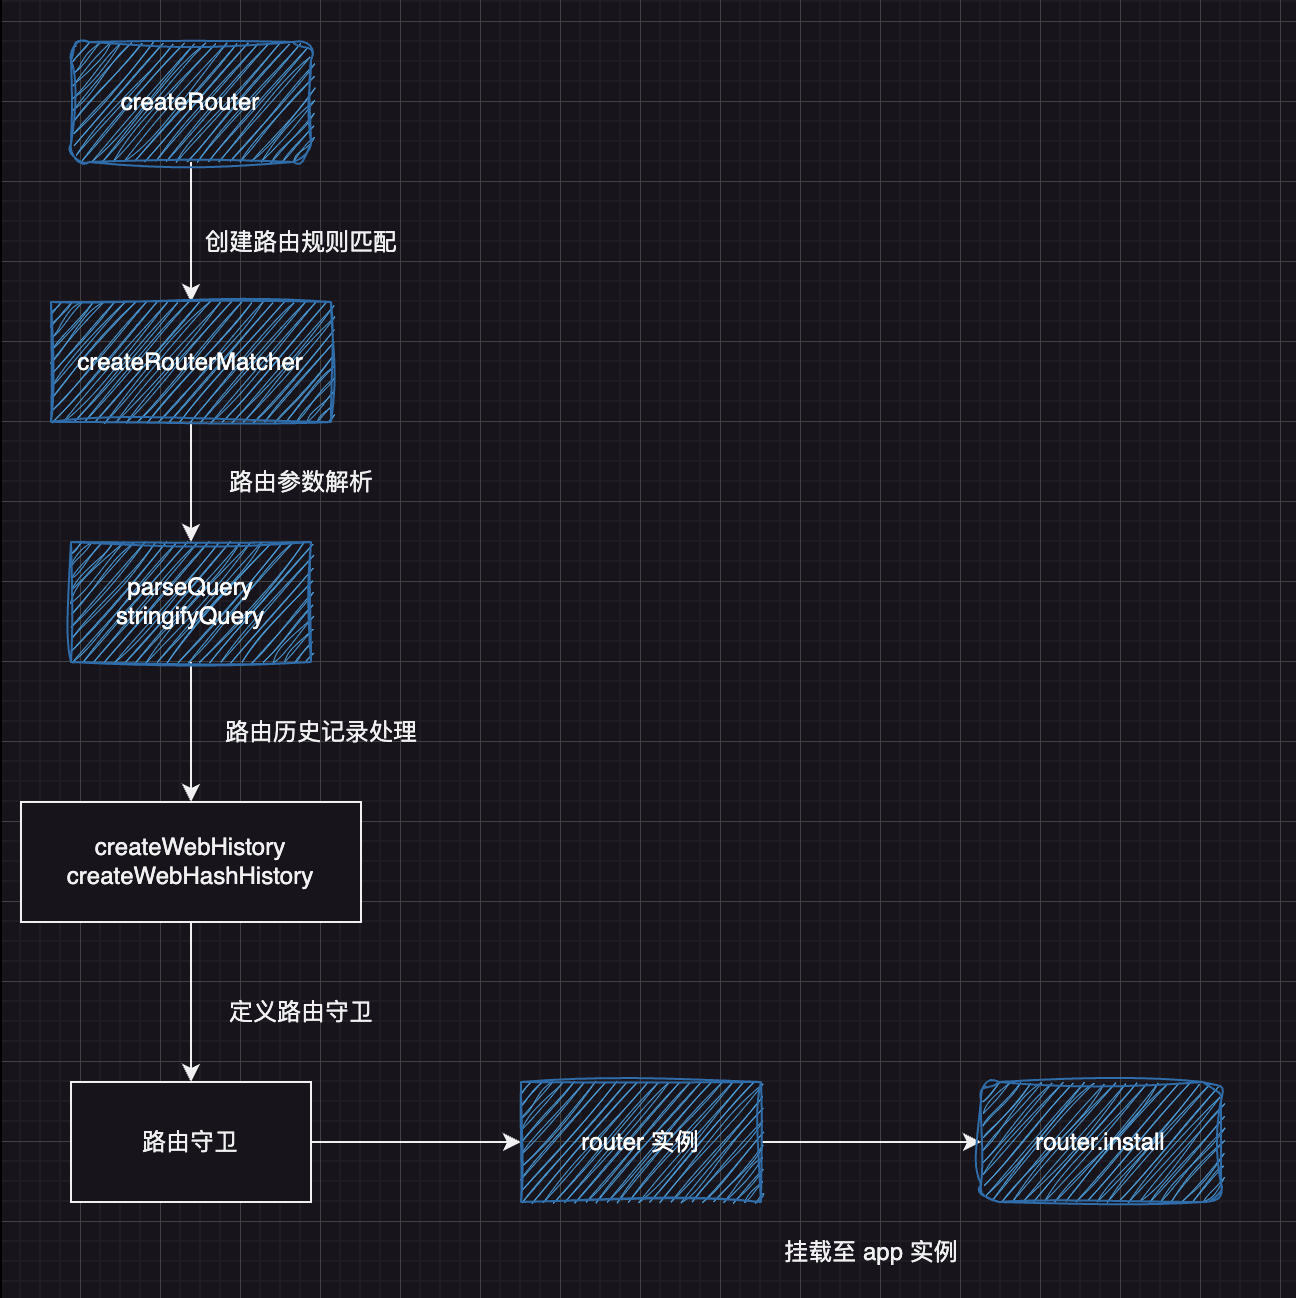
最后我们再总结一下创建路由的整体过程
- 通过
createRouter创建路由 - 通过
createRouterMatcher创建路由规则匹配器 - 通过
parseQuery和stringifyQuery解析路由参数 - 通过
createWebHistory或createWebHashHistory定义路由历史记录处理方式 - 定义路由守卫处理过程
- 返回 router 实例,通过
router.install方法注册至 app 实例