pinia 源码实现解析
基础介绍
pinia 是一个同时支持 Vue2 / Vue3 的状态管理工具,相比于 vuex,pinia 有三个优点
- 简化概念,只保留 state、getter、action,分别对应于 vue 中的 data、computed、methods
- 同时支持 options 和 setup 方式定义和完整的 TS 支持,符合 Vue3 推荐的编程模式
- 体积更小,并且支持 SSR 和代码拆分,性能更好
在基础的使用过程,pinia 也非常简便,这里以 vue3 中使用为例(示例来源于官网)
在安装好 pinia 包之后,在 main 文件中通过 createPinia 方法定义根 pinia 实例
1  import { createApp } from 'vue'
2+ import { createPinia } from 'pinia'
3  import App from './App.vue'
4
5+ const pinia = createPinia()
6  const app = createApp(App)
7
8+ app.use(pinia)
9  app.mount('#app')
在定义好根 pinia 实例之后,需要通过 defineStore 方法定义 Store,defineStore 支持 option 和 setup 方式定义。option 定义便于从 vuex 中迁移,也符合 vue2 的 option api 使用习惯,setup 定义更符合 vue3 的 setup 编程习惯
options 方式定义 Store 示例
1export const useCounterStore = defineStore('counter', {
2  state: () => ({ count: 0 }),
3  getters: {
4    double: (state) => state.count * 2,
5  },
6  actions: {
7    increment() {
8      this.count++
9    },
10  },
11})
setup 方式定义 Store 示例
1export const useCounterStore = defineStore('counter', () => {
2  const count = ref(0)
3
4  function increment() {
5    count.value++
6  }
7
8  return { count, increment }
9})
在定义好 Store 之后,我们就可以直接编码中使用了,需要注意的是,因为 store 是通过 reactive 包装的对象,直接解构会丢失响应性,需用通过 storeToRefs 方法来保持结构后的响应性(类似 vue3 的 toRefs)
1<script setup>
2  import {storeToRefs} from 'pinia' import {useCounterStore} from '@/stores/counter'
3  const counterStore = useCounterStore()
4  // 注意解构 store 需要通过 storeToRefs 方法
5  const {(count, increment)} = storeToRefs(counterStore)
6</script>
源码解析
创建 pinia 实例
从基础介绍可以看到,通过 createPinia 方法创建的了一个 pinia 实例, createPinia 方法的源码主要分为两步
- 定义用于存储全部 store 的 state 对象和插件列表
- 初始化 pinia 实例,注册至 devtool 之后返回 pinia 实例
1export function createPinia(): Pinia {
2  const scope = effectScope(true)
3  // 定义用于存储全部 store 的 state 对象
4  const state = scope.run<Ref<Record<string, StateTree>>>(() =>
5    ref<Record<string, StateTree>>({})
6  )!
7
8  // 定义插件离列表和待安装的插件
9  let _p: Pinia['_p'] = []
10  let toBeInstalled: PiniaPlugin[] = []
11
12  // 定义 pinia 实例
13  const pinia: Pinia = markRaw({
14    install(app: App) {
15      /*...*/
16    },
17
18    use(plugin) {
19      /*...*/
20    },
21
22    _p,
23    _a: null,
24    _e: scope,
25    _s: new Map<string, StoreGeneric>(),
26    state,
27  })
28
29  // 注册 devtool
30  if (USE_DEVTOOLS && typeof Proxy !== 'undefined') {
31    pinia.use(devtoolsPlugin)
32  }
33
34  return pinia
35}
在 pinia 实例中,定义的两个方法,pinia.install 方法用于向 vue 中注册 pinia,在 app.use 执行过程中会直接调用 install 方法。install 方法执行过程分为
- 设置当前激活的 pinia 实例
- 将 pinia 实例通过
provide方法注册到全局,便于所有子组件调用 - 注册 devtool 和插件
pinia.use 方法用于向 pinia 中注册插件,将传入的 plugin 放入插件数组并返回当前 pinia 实例
1const pinia: Pinia = markRaw({
2  install(app: App) {
3    setActivePinia(pinia)
4    if (!isVue2) {
5      pinia._a = app
6      // 重要:将 pinia 实例注册到全局,便于所有子组件调用
7      app.provide(piniaSymbol, pinia)
8      app.config.globalProperties.$pinia = pinia
9      // 注册 devtool
10      if (USE_DEVTOOLS) {
11        registerPiniaDevtools(app, pinia)
12      }
13      // 注册插件
14      toBeInstalled.forEach((plugin) => _p.push(plugin))
15      toBeInstalled = []
16    }
17  },
18
19  use(plugin) {
20    if (!this._a && !isVue2) {
21      toBeInstalled.push(plugin)
22    } else {
23      _p.push(plugin)
24    }
25    return this
26  },
27
28  _p,
29  _a: null,
30  _e: scope,
31  _s: new Map<string, StoreGeneric>(),
32  state,
33})
此外 pinia 实例还包含一些内部属性,比较重要的是的 pinia._s 属性和 pinia.state 属性,前者用于储存 id 和 store 实例的 map 映射,避免重复创建,后者用于存储全部 store 的 state
1const pinia: Pinia = markRaw({
2  _p, // pinia 插件
3  _a: null, // vue app实例
4  _e: scope, // pinia 实例的 effect scope
5  // 核心:存储 id 和 store 实例的 map 映射,避免重复创建
6  _s: new Map<string, StoreGeneric>(),
7  state, // 存储全部 store 的 state
8})
定义 store
在全局创建并注册 pinia 实例后,接下来我们可以定义需要全局管理状态的 store。定义 store 需要通过 defineStore 方法,defineStore 方法首先根据传入参数,判断是 options 定义还是 setup 定义,然后定义内部函数 useStore 并返回
1export function defineStore(
2  idOrOptions: any,
3  setup?: any,
4  setupOptions?: any
5): StoreDefinition {
6  let id: string
7  let options
8
9  // 通过第二个参数是否是 function 类型,判断是否是 setup 形式的 store
10  const isSetupStore = typeof setup === 'function'
11  // idOrOptions 可以是丢像或者 string,通过类型确定 store id 和 options
12  if (typeof idOrOptions === 'string') {
13    id = idOrOptions
14    options = isSetupStore ? setupOptions : setup
15  } else {
16    options = idOrOptions
17    id = idOrOptions.id
18  }
19
20  function useStore(pinia?: Pinia | null, hot?: StoreGeneric): StoreGeneric {
21    //...
22  }
23
24  // 返回 store 的创建结果
25  useStore.$id = id
26  return useStore
27}
useStore 方法执行过程主要分为三步
- 获取 vue 实例,如果 vue 实例存在,通过 inject 方法将 pinia 注入到当前 vue 实例
- 设置当前激活的 pinia 实例
- 判断缓存中是否存在 store id,如果存在直接取出 store 实例并返回,不存在则根据 options 还是 setup 类型创建 store
1function useStore(pinia?: Pinia | null, hot?: StoreGeneric): StoreGeneric {
2  // 获取当前 vue 实例
3  const currentInstance = getCurrentInstance()
4  // 如果 vue 实例存在,通过 inject 方法将 pinia 注入到当前 vue 实例并使用
5  pinia = currentInstance && inject(piniaSymbol, null)
6  // 设置为当前激活的 pinia 实例
7  if (pinia) setActivePinia(pinia)
8  pinia = activePinia!
9
10  // 如果在缓存中没有定义该 store id,则创建
11  if (!pinia._s.has(id)) {
12    // setup 和 options 两种 store 的定义
13    if (isSetupStore) {
14      createSetupStore(id, setup, options, pinia)
15    } else {
16      createOptionsStore(id, options as any, pinia)
17    }
18  }
19
20  // 缓存中存在 store 实例,直接取出并返回
21  const store: StoreGeneric = pinia._s.get(id)!
22  return store as any
23}
createOptionsStore
在 option 类型的定义方法 createOptionsStore 中,定义了一个 setup 方法,并将相关参数传入了 createSetupStore 方法创建一个 store 并返回,所以创建 store 的核心方式还是通过 createSetupStore 方法
1function createOptionsStore(
2  id: Id,
3  options: DefineStoreOptions<Id, S, G, A>,
4  pinia: Pinia,
5  hot?: boolean
6): Store<Id, S, G, A> {
7  const { state, actions, getters } = options
8
9  function setup() {
10    //...
11  }
12
13  // store
14  store = createSetupStore(id, setup, options, pinia, hot, true)
15
16  return store as any
17}
再详细看一下内部定义的 setup 函数,函数的主要功能就是将 state、getters、actions 合并到一个对象中返回,保持和 setup 定义的一致性,便于后续统一处理
1function setup() {
2  // 创建 state 空对象
3  if (!initialState) {
4    /* istanbul ignore if */
5    if (isVue2) {
6      set(pinia.state.value, id, state ? state() : {})
7    } else {
8      pinia.state.value[id] = state ? state() : {}
9    }
10  }
11
12  // 获取 state 属性
13  const localState = toRefs(pinia.state.value[id])
14
15  // 将 state、getters、actions 合并到一个对象中返回
16  return assign(
17    localState,
18    actions,
19    Object.keys(getters || {}).reduce(
20      (computedGetters, name) => {
21        computedGetters[name] = markRaw(
22          computed(() => {
23            setActivePinia(pinia)
24            const store = pinia._s.get(id)!
25            if (isVue2 && !store._r) return
26            return getters![name].call(store, store)
27          })
28        )
29        return computedGetters
30      },
31      {} as Record<string, ComputedRef>
32    )
33  )
34}
createSetupStore
createSetupStore 方法很长,我们逐步拆解为每个步骤进行解读
-
在 setup 场景下,创建一个 state 空对象
1function createSetupStore(/*相关参数*/): Store<Id, S, G, A> { 2 // 1. 在 setup 场景下,创建一个 state 空对象 3 const initialState = pinia.state.value[$id] as UnwrapRef<S> | undefined 4 if (!isOptionsStore && !initialState && (!__DEV__ || !hot)) { 5 if (isVue2) { 6 set(pinia.state.value, $id, {}) 7 } else { 8 pinia.state.value[$id] = {} 9 } 10 } 11} -
创建 partialStore 属性,内部主要包括自定义的方法,在通过 reactive 将 partialStore 转换为响应式 store,并将 store 存储到 pinia._s map 对象中
1function createSetupStore(/*相关参数*/): Store<Id, S, G, A> { 2 // 2. 创建 partialStore 属性,内部主要包括自定义的方法,在通过 reactive 将 partialStore 转换为响应式 store 3 const partialStore = { 4 _p: pinia, 5 $id, 6 $onAction: addSubscription.bind(null, actionSubscriptions), 7 $patch, 8 $reset, 9 $subscribe, 10 $dispose, 11 } as _StoreWithState<Id, S, G, A> 12 const store: Store<Id, S, G, A> = reactive( 13 partialStore 14 ) as unknown as Store<Id, S, G, A> 15 // 将 store 存储到 pinia._s map 对象中 16 pinia._s.set($id, store) 17} -
执行
setup方法,获取 store 数据并且遍历处理。setup返回值主要分为两类,ref / reactive 和 Function,在遍历过程中将 ref / reactive 和 Function 挂载到 store 实例上1function createSetupStore(/*相关参数*/): Store<Id, S, G, A> { 2 // 执行 setup 方法,获取 store 数据 3 const setupStore = pinia._e.run(() => { 4 scope = effectScope() 5 return scope.run(() => setup()) 6 })! 7 8 // 遍历 store 数据 9 for (const key in setupStore) { 10 const prop = setupStore[key] 11 12 // 处理返回属性是 ref 或 reactive 的情况 13 if ((isRef(prop) && !isComputed(prop)) || isReactive(prop)) { 14 // 非 optionsStore 的情况下 15 if (!isOptionsStore) { 16 // 合并 initialState 17 if (initialState && shouldHydrate(prop)) { 18 if (isRef(prop)) { 19 prop.value = initialState[key] 20 } else { 21 mergeReactiveObjects(prop, initialState[key]) 22 } 23 } 24 // 将 prop 赋值给 pinia.state.value[$id][key] 25 if (isVue2) { 26 set(pinia.state.value[$id], key, prop) 27 } else { 28 pinia.state.value[$id][key] = prop 29 } 30 } 31 } 32 // 处理返回函数,即 action 33 else if (typeof prop === 'function') { 34 // 函数进过包装处理 35 const actionValue = wrapAction(key, prop) 36 // 挂载到 store 实例 37 if (isVue2) { 38 set(setupStore, key, actionValue) 39 } else { 40 setupStore[key] = actionValue 41 } 42 optionsForPlugin.actions[key] = prop 43 } 44 } 45} -
定义
$state属性的 get 和 set 方法,可以直接通过$state方法1function createSetupStore(/*相关参数*/): Store<Id, S, G, A> { 2 Object.defineProperty(store, '$state', { 3 get: () => pinia.state.value[$id], 4 set: (state) => { 5 $patch(($state) => { 6 assign($state, state) 7 }) 8 }, 9 }) 10} -
注册 devtool、安装自定义的 plugin,最后返回 store 实例
1function createSetupStore(/*相关参数*/): Store<Id, S, G, A> {
2  // 注册 devtool
3  if (USE_DEVTOOLS) {
4    const nonEnumerable = {
5      writable: true,
6      configurable: true,
7      enumerable: false,
8    }
9
10    ;(
11      ['_p', '_hmrPayload', '_getters', '_customProperties'] as const
12    ).forEach((p) => {
13      Object.defineProperty(
14        store,
15        p,
16        assign({ value: store[p] }, nonEnumerable)
17      )
18    })
19  }
20
21  // 安装 plugin
22  pinia._p.forEach((extender) => {
23    if (USE_DEVTOOLS) {
24      const extensions = scope.run(() =>
25        extender({
26          store,
27          app: pinia._a,
28          pinia,
29          options: optionsForPlugin,
30        })
31      )!
32      Object.keys(extensions || {}).forEach((key) =>
33        store._customProperties.add(key)
34      )
35      assign(store, extensions)
36    } else {
37      assign(
38        store,
39        scope.run(() =>
40          extender({
41            store,
42            app: pinia._a,
43            pinia,
44            options: optionsForPlugin,
45          })
46        )!
47      )
48    }
49  })
50
51  return store
52}
至此 createSetupStore 方法创建 store 实例的方法就结束了
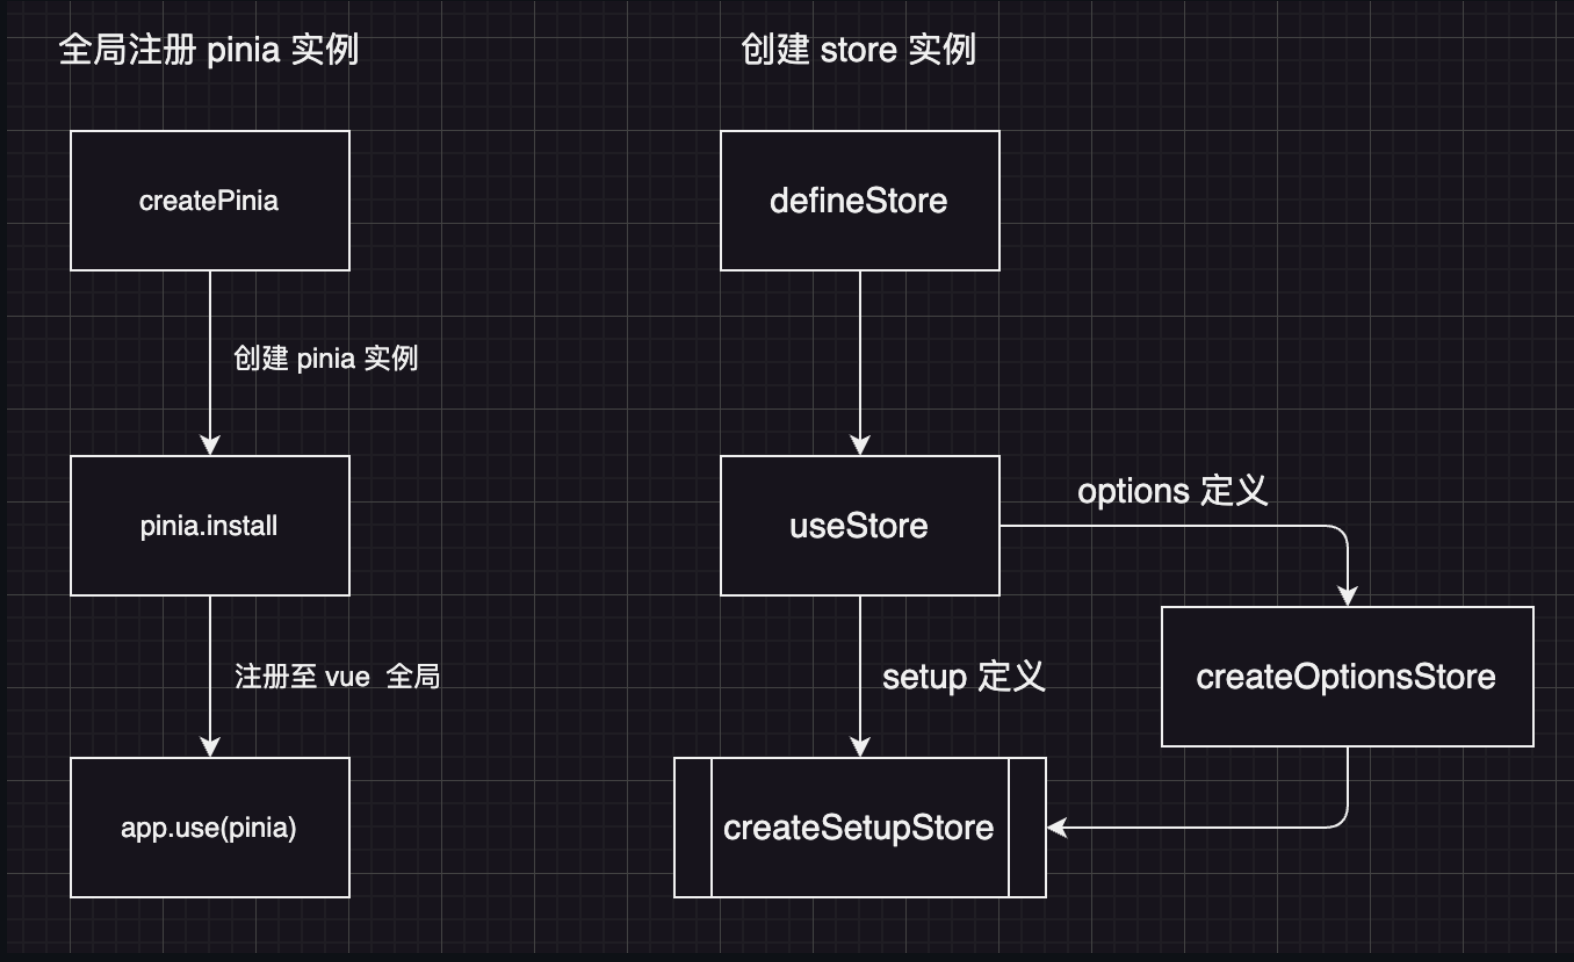
原理回顾
最后我们回顾一下整体的实现流程