深入 vite 原理,vite 是如何解析配置文件的
在上一篇文章介绍了在开发环境启动 vite 的整体实现过程,其中第一步配置文件解析是最为重要的部分,下面展开讲讲 vite 解析配置文件的实现原理
1const config = await resolveConfig(inlineConfig, 'serve')配置文件解析
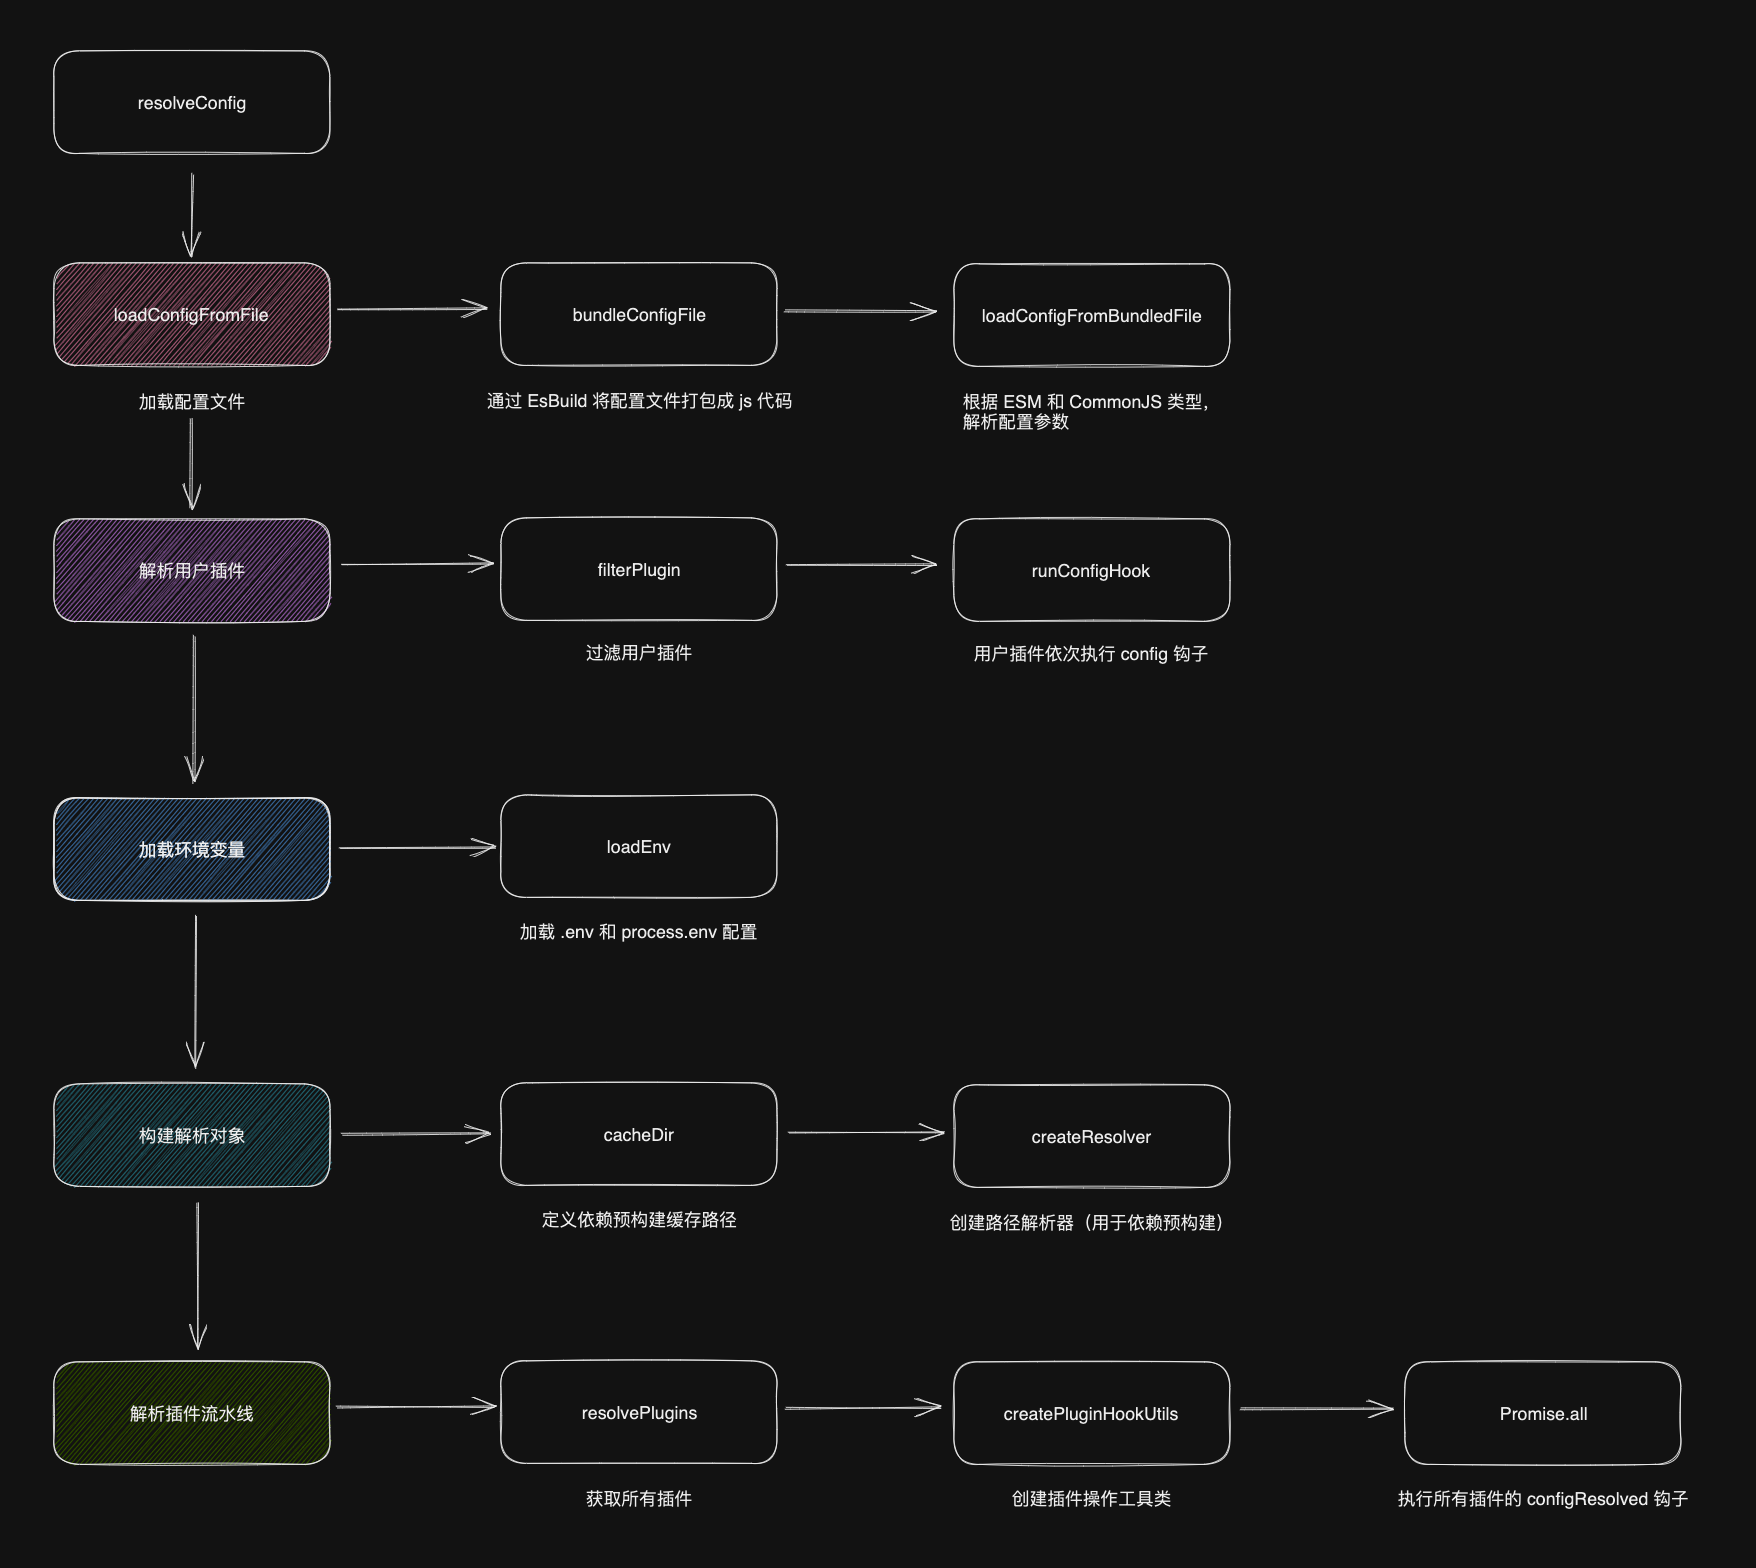
配置文件解析的核心方法是 resolveConfig ,方法定义在 packages/vite/src/node/config.ts 文件下,解析配置文件的过程主要有五步
- 加载配置文件
- 解析用户插件
- 加载环境变量
- 创建路径解析器
- 解析插件流水线,调用每个插件的
configResolved钩子
第一步:加载配置文件
vite 的配置主要来自两个地方:命令行和配置文件。命令行配置在启动项目时,通过 cac 解析并传递到了 resolveConfig 方法中,而配置文件中的配置则需要通过 loadConfigFromFile 方法加载
获取到命令行和配置文件的配置后,通过 mergeConfig 方法合并两个配置,其中命令行配置的优先级是高于配置文件的
1export async function resolveConfig(inlineConfig: InlineConfig) {
2  // 此处的 config 是 命令行配置
3  let config = inlineConfig
4
5  // ========== 1. 加载配置文件 ==========
6  let { configFile } = config
7  if (configFile !== false) {
8    const loadResult = await loadConfigFromFile(
9      configEnv,
10      configFile,
11      config.root,
12      config.logLevel
13    )
14    if (loadResult) {
15      // 命令行配置和配置文件配置合并
16      config = mergeConfig(loadResult.config, config)
17      configFile = loadResult.path
18      configFileDependencies = loadResult.dependencies
19    }
20  }
21}
vite 的配置文件都定义 vite.config 文件下,但根据 ts / js、ESModule / CommonJS 划分,一共有六种文件后缀
1export const DEFAULT_CONFIG_FILES = [
2  'vite.config.js',
3  'vite.config.mjs',
4  'vite.config.ts',
5  'vite.config.cjs',
6  'vite.config.mts',
7  'vite.config.cts',
8]
loadConfigFromFile 解析配置文件的第一步就是获取配置文件路径,然后根据文件类型和 package.json 的配置判断是 ESModule 还是 CommonJS,因为两种模式的配置文件加载方式存在一定区别
1export async function loadConfigFromFile(
2  configEnv: ConfigEnv,
3  configFile?: string,
4  configRoot: string = process.cwd(),
5  logLevel?: LogLevel,
6): Promise<{
7  path: string
8  config: UserConfig
9  dependencies: string[]
10} | null> {
11
12  // 1. 获取配置文件路径
13  let resolvedPath: string | undefined
14  // 如果定义配置文件路径,直接解析
15  if (configFile) {
16    resolvedPath = path.resolve(configFile)
17  } else {
18    // 没有定义,从默认的 6 个配置文件定义中获取
19    for (const filename of DEFAULT_CONFIG_FILES) {
20      const filePath = path.resolve(configRoot, filename)
21      if (!fs.existsSync(filePath)) continue
22
23      resolvedPath = filePath
24      break
25    }
26  }
27
28  // 2. 判断是 ESModule 还是 CommonJS
29  let isESM = false
30  if (/\.m[jt]s$/.test(resolvedPath)) {
31    isESM = true
32  } else if (/\.c[jt]s$/.test(resolvedPath)) {
33    isESM = false
34  } else {
35    try {
36      const pkg = lookupFile(configRoot, ['package.json'])
37      isESM =
38        !!pkg && JSON.parse(fs.readFileSync(pkg, 'utf-8')).type === 'module'
39    } catch (e) {}
40  }
41
42  try {
43    // 3. 通过 EsBuild 将配置文件打包成 js 代码
44    const bundled = await bundleConfigFile(resolvedPath, isESM)
45    // 4. 解析配置参数
46    const userConfig = await loadConfigFromBundledFile
47    (
48      resolvedPath,
49      bundled.code,
50      isESM,
51    )
52
53    const config = await (typeof userConfig === 'function'
54      ? userConfig(configEnv)
55      : userConfig
56    }
57    return {
58      path: normalizePath(resolvedPath),
59      config,
60      dependencies: bundled.dependencies,
61    }
62  } catch (e) {
63    throw e
64  }
65}
接下来通过 bundleConfigFile 方法,使用 esbuild 将配置文件打包成 js 代码
除了基础的配置参数外,注意到 write 参数配置的是 false,也就是不写入文件,这样可以提升打包速度
此外在打包过程中也会定义两个插件
- externalize-deps 插件:用于处理外部依赖解析,通过 onResolve 钩子处理依赖解析,将非相对路径的依赖和内置模块标记为外部依赖。这样打包工具就不需要处理被标记过的外部插件,可以有效减少打包体积
- inject-file-scope-variables 插件:用于在文件作用域内注入变量
1async function bundleConfigFile(
2  fileName: string,
3  isESM: boolean
4): Promise<{ code: string; dependencies: string[] }> {
5  const dirnameVarName = '__vite_injected_original_dirname'
6  const filenameVarName = '__vite_injected_original_filename'
7  const importMetaUrlVarName = '__vite_injected_original_import_meta_url'
8  const result = await build({
9    absWorkingDir: process.cwd(), // 工作目录绝对路径
10    entryPoints: [fileName], // 打包入口文件
11    outfile: 'out.js', // 输出文件路径(实际上不会写入文件)
12    write: false, // 不写入文件
13    target: ['node14.18', 'node16'], // 打包 ndoe 版本
14    platform: 'node', // 目标平台为 Node.js
15    bundle: true, // 打包为单个文件
16    format: isESM ? 'esm' : 'cjs', // 打包格式,esm 或者 cjs
17    mainFields: ['main'], // 入口文件字段
18    sourcemap: 'inline',
19    metafile: true,
20    // 需要注入的全局字段
21    define: {
22      __dirname: dirnameVarName,
23      __filename: filenameVarName,
24      'import.meta.url': importMetaUrlVarName,
25    },
26    plugins: [
27      {
28        // 处理外部依赖解析
29        // 通过 onResolve 钩子处理依赖解析,将非相对路径的依赖和内置模块标记为外部依赖
30        // 通过返回 { external: true } 来告知打包工具不需要处理
31        name: 'externalize-deps',
32        setup(build) {},
33      },
34      {
35        // 作用:文件作用域内注入变量
36        // 通过 onLoad 钩子读取文件内容,在内容前添加变量的注入代码
37        name: 'inject-file-scope-variables',
38        setup(build) {},
39      },
40    ],
41  })
42  const { text } = result.outputFiles[0]
43  return {
44    code: text,
45    dependencies: result.metafile ? Object.keys(result.metafile.inputs) : [],
46  }
47}
在获取打包好的配置文件之后,会通过 loadConfigFromBundledFile 方法来解析配置参数,这里对于 ESModule 和 CommonJS 的处理逻辑的是有区别的,对于 ESModule 采用的 AOP 编译的方式,主要分为三步
- 将编译后代码写入临时文件
- 通过 ESM import 读取临时内容
- 获取配置内容后删除临时内容
1async function loadConfigFromBundledFile(
2  fileName: string,
3  bundledCode: string,
4  isESM: boolean
5): Promise<UserConfigExport> {
6  if (isESM) {
7    const fileBase = `${fileName}.timestamp-${Date.now()}-${Math.random().toString(16).slice(2)}`
8    const fileNameTmp = `${fileBase}.mjs`
9    const fileUrl = `${pathToFileURL(fileBase)}.mjs`
10    // 编译后代码写入 临时文件
11    await fsp.writeFile(fileNameTmp, bundledCode)
12    try {
13      // 通过 ESM import 读取临时内容
14      return (await dynamicImport(fileUrl)).default
15    } finally {
16      // 获取配置内容后删除临时内容
17      fs.unlink(fileNameTmp, () => {})
18    }
19  }
20  // CommonJS 处理方式
21  else {
22  }
23}
而对于 CommonJS,采用的是 JIT 即时编译的方式
- 重写原生
require.entensions方法,特殊处理 vite 配置文件 - 清除 require 缓存,调用 require 方法获取配置
- 恢复原生
require.entensions方法
1async function loadConfigFromBundledFile(
2  fileName: string,
3  bundledCode: string,
4  isESM: boolean
5): Promise<UserConfigExport> {
6  if (isESM) {
7  }
8  // CommonJS 处理方式
9  else {
10    const extension = path.extname(fileName)
11    const realFileName = await promisifiedRealpath(fileName)
12    const loaderExt = extension in _require.extensions ? extension : '.js'
13    // 默认拦截器
14    const defaultLoader = _require.extensions[loaderExt]!
15    // 通过拦截原生 require.extensions 的加载函数实现加载 bundle 后配置
16    _require.extensions[loaderExt] = (module: NodeModule, filename: string) => {
17      if (filename === realFileName) {
18        // 特殊处理 vite 配置文件
19        ;(module as NodeModuleWithCompile)._compile(bundledCode, filename)
20      } else {
21        defaultLoader(module, filename)
22      }
23    }
24    // 清除 require 缓存
25    delete _require.cache[_require.resolve(fileName)]
26    // 调用 require 获取配置对象
27    const raw = _require(fileName)
28    // 恢复原生 require.extensions
29    _require.extensions[loaderExt] = defaultLoader
30    return raw.__esModule ? raw.default : raw
31  }
32}
之所以要做这样的区分,是因为 ESModule 在 Node 环境执行过程中需要手动加上 --experimental-loader 参数才能正常运行自定义 loader,所以要采用 AOP 编译这种 hack 的方式保证 ESModule 配置文件的正确执行。对于 CommonJS,可以直接注册一个自定义 loader 处理配置文件,所以通过拦截 require.extensions 来实现对打包后的配置文件的加载
小结一下获取配置文件这一步骤,通过入口方法 loadConfigFromFile 加载配置文件,经过获取配置文件的路径,判断配置文件类型之后,通过 bundleConfigFile 方法将配置文件打包成 js 代码,再通过 loadConfigFromBundledFile 方法解析配置参数

第二步:解析用户插件
在解析用户插件时,会先通过 apply 参数过滤出用户定义的插件,然后按照 pre、normal、post 获取三类用户插件
1// 通过 apply 参数过滤出用户插件
2const filterPlugin = (p: Plugin) => {
3  if (!p) {
4    return false
5  } else if (!p.apply) {
6    return true
7  } else if (typeof p.apply === 'function') {
8    return p.apply({ ...config, mode }, configEnv)
9  } else {
10    return p.apply === command
11  }
12}
13
14// resolve plugins
15const rawUserPlugins = (
16  (await asyncFlatten(config.plugins || [])) as Plugin[]
17).filter(filterPlugin)
18
19// 对用户插件进行排序,获取 pre、normal、post 三类用户插件
20const [prePlugins, normalPlugins, postPlugins] = sortUserPlugins(rawUserPlugins)
接下来根据 pre、normal、post 顺序,通过 runConfigHook 方法执行用户定义的插件
1const userPlugins = [...prePlugins, ...normalPlugins, ...postPlugins]
2config = await runConfigHook(config, userPlugins, configEnv)
3
4async function runConfigHook(
5  config: InlineConfig,
6  plugins: Plugin[],
7  configEnv: ConfigEnv
8): Promise<InlineConfig> {
9  let conf = config
10
11  for (const p of getSortedPluginsByHook('config', plugins)) {
12    const hook = p.config
13    const handler = hook && 'handler' in hook ? hook.handler : hook
14    if (handler) {
15      const res = await handler(conf, configEnv)
16      if (res) {
17        conf = mergeConfig(conf, res)
18      }
19    }
20  }
21
22  return conf
23}
这一步相对比较简单,就是获取用户定义的插件,然后依次执行就好

第三步:加载环境变量
加载环境变量的第一步是先通过 normalizePath 方法获取到环境变量文件地址,然后通过 loadEnv 方法获取环境变量
1// 获取环境变量文件地址
2const envDir = config.envDir
3  ? normalizePath(path.resolve(resolvedRoot, config.envDir))
4  : resolvedRoot
5// 加载环境变量配置
6const userEnv = loadEnv(mode, envDir, resolveEnvPrefix(config))
loadEnv 方法首先会读取 .env 文件配置,按照 .env -> .env.local -> .env.[mode] -> .env.[mode].local 的顺序依次读取配置文件,然后会读取 process.env 的配置
需要注意的是,不论是 .env 配置还是 process.env 配置,都需要以 VITE_ 开头
1export function loadEnv(
2  mode: string,
3  envDir: string,
4  prefixes: string | string[] = 'VITE_'
5): Record<string, string> {
6  prefixes = arraify(prefixes)
7  const env: Record<string, string> = {}
8  const envFiles = [
9    /** default file */ `.env`,
10    /** local file */ `.env.local`,
11    /** mode file */ `.env.${mode}`,
12    /** mode local file */ `.env.${mode}.local`,
13  ]
14
15  // 解析 .env 文件配置
16  const parsed = Object.fromEntries(
17    envFiles.flatMap((file) => {
18      const filePath = path.join(envDir, file)
19      if (!tryStatSync(filePath)?.isFile()) return []
20
21      return Object.entries(parse(fs.readFileSync(filePath)))
22    })
23  )
24  expand({ parsed })
25
26  // 依次读取 .env 文件配置, .env.local 文件配置, .env.[mode] 文件配置, .env.[mode].local 文件配置,需要以 VITE_ 开头
27  for (const [key, value] of Object.entries(parsed)) {
28    if (prefixes.some((prefix) => key.startsWith(prefix))) {
29      env[key] = value
30    }
31  }
32
33  // 读取 process.env 配置,需要以 VITE_ 开头
34  for (const key in process.env) {
35    if (prefixes.some((prefix) => key.startsWith(prefix))) {
36      env[key] = process.env[key] as string
37    }
38  }
39
40  return env
41}
第四步:构建解析对象
最终返回的 resolved 解析对象有非常多的属性和方法,这里单独介绍两个和依赖预构建相关的属性
第一个 cacheDir 是预构建产物缓存的目录,顺序为:自定义 cacheDir 配置 -> node_modules/.vite 目录 -> .vite 目录
1// 解析依赖预构建的缓存目录
2const cacheDir = normalizePath(
3  config.cacheDir
4    ? path.resolve(resolvedRoot, config.cacheDir)
5    : pkgDir
6      ? path.join(pkgDir, `node_modules/.vite`)
7      : path.join(resolvedRoot, `.vite`)
8)
第二个 createResolver 方法会创建一个创建模块解析器,用于解析模块的依赖关系和别名,处理依赖预构建,对于别名解析和实际模块解析会使用不同的 pluginContaier,最后统一调用插件容器的 resolveId 方法获取解析结果
1const createResolver: ResolvedConfig['createResolver'] = (options) => {
2  let aliasContainer: PluginContainer | undefined
3  let resolverContainer: PluginContainer | undefined
4  return async (id, importer, aliasOnly, ssr) => {
5    let container: PluginContainer
6    // 别名解析和实际模块解析使用不同的 container
7    if (aliasOnly) {
8      // 新建别名 container
9      container =
10        aliasContainer ||
11        (aliasContainer = await createPluginContainer({
12          ...resolved,
13          plugins: [aliasPlugin({ entries: resolved.resolve.alias })],
14        }))
15    } else {
16      // 新建解析 container
17      container =
18        resolverContainer ||
19        (resolverContainer = await createPluginContainer({
20          ...resolved,
21          plugins: [
22            aliasPlugin({ entries: resolved.resolve.alias }),
23            resolvePlugin({
24              ...resolved.resolve,
25              root: resolvedRoot,
26              isProduction,
27              isBuild: command === 'build',
28              ssrConfig: resolved.ssr,
29              asSrc: true,
30              preferRelative: false,
31              tryIndex: true,
32              ...options,
33              idOnly: true,
34            }),
35          ],
36        }))
37    }
38    return (
39      // 调用插件容器的 resolveId 方法来查找给定模块 ID 的解析结果
40      (
41        await container.resolveId(id, importer, {
42          ssr,
43          scan: options?.scan,
44        })
45      )?.id
46    )
47  }
48}
然后会创建一个 resolvedConfig 对象,resolvedConfig 包含在配置文件解析过程中新增的属性和方法,最后将 config 和 resolvedConfig 统一汇总到 resolved 对象
1const resolvedConfig: ResolvedConfig = {
2  // 配置文件的路径
3  configFile: configFile ? normalizePath(configFile) : undefined,
4  // 配置文件依赖的文件路径列表
5  configFileDependencies: configFileDependencies.map((name) =>
6    normalizePath(path.resolve(name))
7  ),
8  // 内联的配置对象(命令行配置)
9  inlineConfig,
10  // 项目根目录的绝对路径
11  root: resolvedRoot,
12  // 项目的基础路径
13  base: resolvedBase.endsWith('/') ? resolvedBase : resolvedBase + '/',
14  rawBase: resolvedBase, // 未经处理的项目基础路径
15  // 模块解析选项
16  resolve: resolveOptions,
17  // 公共目录的绝对路径
18  publicDir: resolvedPublicDir,
19  // 缓存目录的绝对路径
20  cacheDir,
21  // 命令行命令
22  command,
23  // 运行模式(开发模式或生产模式)
24  mode,
25  // 是否作为 worker 运行
26  isWorker: false,
27  // 主配置文件,当前版本无效
28  mainConfig: null,
29  // 是否是生产环境
30  isProduction,
31  // 用户配置的插件列表
32  plugins: userPlugins,
33  // CSS 配置选项
34  css: resolveCSSOptions(config.css),
35  // esbuild 配置选项
36  esbuild:
37    config.esbuild === false
38      ? false
39      : {
40          jsxDev: !isProduction,
41          ...config.esbuild,
42        },
43  // 服务器配置选项
44  server,
45  // 构建配置选项
46  build: resolvedBuildOptions,
47  // 预览配置选项
48  preview: resolvePreviewOptions(config.preview, server),
49  // 环境变量目录的绝对路径
50  envDir,
51  // 环境变量的映射对象
52  env: {
53    ...userEnv,
54    BASE_URL,
55    MODE: mode,
56    DEV: !isProduction,
57    PROD: isProduction,
58  },
59  // 决定是否包含在构建的资源文件列表中
60  assetsInclude(file: string) {
61    return DEFAULT_ASSETS_RE.test(file) || assetsFilter(file)
62  },
63  // 日志记录器
64  logger,
65  // 包缓存
66  packageCache,
67  // 创建模块解析器的函数
68  createResolver,
69  // 优化依赖的选项
70  optimizeDeps: {
71    disabled: 'build',
72    ...optimizeDeps,
73    esbuildOptions: {
74      preserveSymlinks: resolveOptions.preserveSymlinks,
75      ...optimizeDeps.esbuildOptions,
76    },
77  },
78  // Worker 配置选项
79  worker: resolvedWorkerOptions,
80  // 应用类型(SPA 或 SSR)
81  appType: config.appType ?? (middlewareMode === 'ssr' ? 'custom' : 'spa'),
82  // 获取排序后的插件列表的函数
83  getSortedPlugins: undefined!,
84  // 获取排序后的插件钩子列表的函数
85  getSortedPluginHooks: undefined!,
86}
87
88// 解析后的对象统一放入 resolved 中
89const resolved: ResolvedConfig = {
90  ...config,
91  ...resolvedConfig,
92}
第五步:解析插件流水线
这一步首先首先通过 resolvePlugins 方法收集执行过程所有插件,主要分为五类插件
- 别名插件
- 用户自定义 pre 插件(带有
enforce: "pre"属性) - vite 核心插件
- Vite 生产环境插件 & 用户插件(带有
enforce: "post"属性) - 开发特有插件
1// 目录:packages/vite/src/node/plugins/index.ts
2
3export async function resolvePlugins(
4  config: ResolvedConfig,
5  prePlugins: Plugin[],
6  normalPlugins: Plugin[],
7  postPlugins: Plugin[]
8): Promise<Plugin[]> {
9  const isBuild = config.command === 'build'
10  const isWatch = isBuild && !!config.build.watch
11  const buildPlugins = isBuild
12    ? await (await import('../build')).resolveBuildPlugins(config)
13    : { pre: [], post: [] }
14  const { modulePreload } = config.build
15
16  return [
17    ...(isDepsOptimizerEnabled(config, false) ||
18    isDepsOptimizerEnabled(config, true)
19      ? [
20          isBuild
21            ? optimizedDepsBuildPlugin(config)
22            : optimizedDepsPlugin(config),
23        ]
24      : []),
25    isWatch ? ensureWatchPlugin() : null,
26    isBuild ? metadataPlugin() : null,
27    watchPackageDataPlugin(config.packageCache),
28    // ===== 1. 别名插件 =====
29    preAliasPlugin(config),
30    aliasPlugin({ entries: config.resolve.alias }),
31    // ===== 2. 用户自定义 pre 插件(带有`enforce: "pre"`属性) =====
32    ...prePlugins,
33    // ===== 3. vite 核心插件 =====
34    modulePreload === true ||
35    (typeof modulePreload === 'object' && modulePreload.polyfill)
36      ? modulePreloadPolyfillPlugin(config)
37      : null,
38    resolvePlugin({
39      ...config.resolve,
40      root: config.root,
41      isProduction: config.isProduction,
42      isBuild,
43      packageCache: config.packageCache,
44      ssrConfig: config.ssr,
45      asSrc: true,
46      getDepsOptimizer: (ssr: boolean) => getDepsOptimizer(config, ssr),
47      shouldExternalize:
48        isBuild && config.build.ssr && config.ssr?.format !== 'cjs'
49          ? (id, importer) => shouldExternalizeForSSR(id, importer, config)
50          : undefined,
51    }),
52    htmlInlineProxyPlugin(config),
53    cssPlugin(config),
54    config.esbuild !== false ? esbuildPlugin(config) : null,
55    jsonPlugin(
56      {
57        namedExports: true,
58        ...config.json,
59      },
60      isBuild
61    ),
62    wasmHelperPlugin(config),
63    webWorkerPlugin(config),
64    assetPlugin(config),
65    ...normalPlugins,
66    wasmFallbackPlugin(),
67    // ===== 4. Vite 生产环境插件 & 用户插件(带有 `enforce: "post"`属性) =====
68    definePlugin(config),
69    cssPostPlugin(config),
70    isBuild && buildHtmlPlugin(config),
71    workerImportMetaUrlPlugin(config),
72    assetImportMetaUrlPlugin(config),
73    ...buildPlugins.pre,
74    dynamicImportVarsPlugin(config),
75    importGlobPlugin(config),
76    ...postPlugins,
77    ...buildPlugins.post,
78    // ===== 6. 开发特有插件 =====
79    ...(isBuild
80      ? []
81      : [clientInjectionsPlugin(config), importAnalysisPlugin(config)]),
82  ].filter(Boolean) as Plugin[]
83}
获取所有插件之后,通过 createPluginHookUtils 方法添加插件操作工具函数,主要是获取排序后的插件和排序后的插件 hooks,这里单独封装的目的主要是将获取结果放到缓存中,提升性能
1export function createPluginHookUtils(
2  plugins: readonly Plugin[]
3): PluginHookUtils {
4  const sortedPluginsCache = new Map<keyof Plugin, Plugin[]>()
5
6  // 获取排序后的插件
7  function getSortedPlugins(hookName: keyof Plugin): Plugin[] {
8    if (sortedPluginsCache.has(hookName))
9      return sortedPluginsCache.get(hookName)!
10    const sorted = getSortedPluginsByHook(hookName, plugins)
11    sortedPluginsCache.set(hookName, sorted)
12    return sorted
13  }
14  // 获取排序后插件 hooks
15  function getSortedPluginHooks<K extends keyof Plugin>(
16    hookName: K
17  ): NonNullable<HookHandler<Plugin[K]>>[] {
18    const plugins = getSortedPlugins(hookName)
19    return plugins
20      .map((p) => {
21        const hook = p[hookName]!
22        return typeof hook === 'object' && 'handler' in hook
23          ? hook.handler
24          : hook
25      })
26      .filter(Boolean)
27  }
28
29  return {
30    getSortedPlugins,
31    getSortedPluginHooks,
32  }
33}
最后再通过 Promise.all 方法,按顺序执行执行所有插件的 configResolved 钩子
1await Promise.all([
2  ...resolved
3    .getSortedPluginHooks('configResolved')
4    .map((hook) => hook(resolved)),
5  ...resolvedConfig.worker
6    .getSortedPluginHooks('configResolved')
7    .map((hook) => hook(workerResolved)),
8])
总结
最后总结一下 vite 解析配置文件的全过程,一共分为五个步骤
- 加载配置文件:获取配置文件路径后,通过 EsBuild 将配置文件打包成 js 代码,并根据配置文件是 ESM 还是 CommonJS 进行不同的解析操作
- 解析用户插件:过滤出用户插件之后,依次执行用户插件的 config 钩子
- 加载环境变量:依次加载
.env配置文件和process.env中以 VITE_ 开头的环境变量 - 构建解析对象:包含配置文件解析过程中新增的属性和方法
- 解析插件流水线:获取所有插件后,并行执行插件的 configResolved 钩子